 The first one here is a model of a Russian Typhoon Class submarine. These are the largest submarines that have been built to date.
 The second one is a Victor III Class submarine. The information on the submarine is shown in close up here.
The first one here is a model of a Russian Typhoon Class submarine. These are the largest submarines that have been built to date.The second one is a Victor III Class submarine. The information on the submarine is shown in close up here.
The second one is a Victor III Class submarine. The information on the submarine is shown in close up here.
The first one here is a model of a Russian Typhoon Class submarine. These are the largest submarines that have been built to date.The second one is a Victor III Class submarine. The information on the submarine is shown in close up here.


 This is a tool for cutting planking and other thin strips of wood, plastic, bamboo, or any other material. The cutter has been built square so that material being cut will be cut square. A stopper can be attached at a given length. This will allow repetitive cuts that will always be square and always the same length.
 A tool like this can be built from almost any material to hand. The blade can be a knife blade, double edge razor blade or single edge razor blade. The bed can be any length needed. This tool can be customized to fit the user's needs.
 The builder has doubled the number of frames that were on the plans he had. The number of frames in the model is half of the number of frames in the actual ship. This building method involves cutting out a hole in a board that allows the indexing of frames that have been made extra long at the top end. This lets the builder align the frames and keep them rigid as the building of the model proceeds. Later on the frames will be cut away from the board and construction will go on from there.
 With this model the builder has added abutments at the end of the board that allow him to work on the model while it is in a right-side-up position. Here can be seen the installation of one of the lower decks. The planking is in place and detailing is proceeding from there.
 The black surfaced object here is a piece of wood that has had one surface painted black. It will then be cut into strips that will be used for planking the decks. The black edge gives the appearance of caulking. An alternative to this is to have a number of planks stacked together and held fast at the ends with some glue. The edges are then covered with black paint. The result will be similar. Another method I have seen used is to glue strips of black paper to the edges of the planks.
 Part of the detailing that is added to the decks is a large number of grates. One of these can be seen under construction here. The builder of this model built a jig that is used with a small table saw. Building a jig is a very common practice to produce these grates.
 This is another view of the model under construction. This building method has definite advantages and it is used by many modellers.
 This is a model of a fishing trawler in 1:35 scale. This is the builder's second wooden model. He built the Boston Whitehall Tender shown earlier.
 Artesania Latina produce this model kit, which comes with plans, wood stock for planking and many fittings. The instructions for this kit are fairly good. The bulk heads and other parts have been precut with a laser. In this kit the manufacturer has done a very good job with this as the precut parts did not need any further adjustment.
 The rig shown here was built from scraps of aluminum angle material along with some machined bolts and wing nuts. On the cross bar at the top a threaded rod holds a digital camera in place.
 With adequate lighting in place to minimize glare from the flash unit on the camera, text, plans and other such things can be placed on the table below. Material being photographed in this way is always square to the lens and a fixed distance away.
 Shown here are some of the windows being made for the model of HMS Bounty. As we now have two models of Bounty residing on this site, the Bounty these windows are for is the one shown in the post titled, 'Earlier pictures of HMS Bounty.'
 This is the first wooden boat model that this modeller has built. The kit is by Midwest and the model is 1:14 scale or 7/8" to the foot. The history of the boat on the box top reads, "The Whitehall originated about 1820, around the New York waterfront, and takes its name from the nearby Whitehall Street. Commonly built in Boston boat shops of that era, Whitehalls were originally used by runners who would row out to incoming deep water vessels to accost the crews, pitching the local brothels, ship chandlers, and the like. Because of their grace and beauty, there has been a renewed interest in the Whitehall boats within the last fifty years."
 The plans shown here, included in the kit, are drawn to the full size of the finished model and provide the builder with all the information needed to build the boat. The forms on the far right are used to make the shape of the hull while the planking is being done. Later on in the construction they are removed.
 The transom and some of the interior detail near the stern can be seen here. The interior has been painted with a buff colour.
 The oarlocks, visible in this picture, are metal castings included in the kit. The seats and other detail can also be seen. As well as the purpose described on the box top of the kit, these boats were also used to carry cargo to and from the ships anchored in the harbour.
 The bottom of the hull is shown here with the oars and written instructions that come with the kit. The oars are made from two pieces.
 This is an excellent model for a beginner or an old hand who wants to build something quickly. A model of this size and relative simplicity can be completed in a fairly short time, gives the builder practice at working with wood and plans and solidly builds the modeller's confidence in his skills.
 Here you can see the hull of the ship taking shape on the plug that has been carved to the inside dimension of the frames. The frames above the bilge line have had filler added between them, to strengthen them when it comes time to cut out the holes for the gun ports and scuppers. This filler will be covered up when the hull is planked.
 In this top view you can see the plug as it has been cut into five sections. The centre part on the top is held in place with spacers on either side. The plug's extension well above the gunwale allows the plug and hull assembly to be held in a vise, which makes working on the hull much easier. The dowels extending from the sides are used to index the parts of the plug.
 This is the keel part, which is held in place temporarily with pins. In the final assembly the various parts will be glued permanently. The hull above the keel is pinned and comes apart in two halves. In the final assembly they will be glued as well.
 In the final picture you can see that the tops of the frames are uneven. They will be evened out later. When the holly parts have been finished and before the next step of working with the ebony parts, the hull will get a thin coating of a clear flat varnish to seal the pores.
 Let's start with getting all the jokes about the missing boat out of the way. This is the set-up assembly of a mast for a radio controlled sailboat. The material for the mast is made specifically for this purpose. It has an aerodynamic shape and a longitudinal slot where bolts can be secured.
 The mast and boom sections were cut to length and the other parts were either scratch built or 'borrowed' from places where they have other uses.
 The wire that can be seen on the right is used for turning the fitting on the end of the boom. A closer view below shows this better.
 All of the lines and the rubber bands that you see will be replaced when the mast and booms are installed on the boat.
 The sail attaches at this point. A section of the boom has been cut away. The attachment point for the sail is on a threaded rod. Turning the rod adjusts the tension on the sail.
 The part that extends from the boom is a ball joint connector that normally acts as a clevis for a connecting rod used with a radio control servo. Here it allows for the attachment of a turning rod so that the sail attachment point can be adjusted.
 These are some photographs of the model of HMS Bounty that was shown in a posting in November 2006. These pictures were taken earlier in the model's construction.
 The deck framing for the main deck can be seen here with the deck beneath it completed. Most of what you see here has been planked over and is no longer available to be viewed. There are many ship modellers who build this way.
 More of the deck framing can be seen here. I believe that it is informative as well as interesting to see the various stages in a model's construction.
 You can see here that some decking, gratings and other such detail has been added. As well basic masts are in place. These may be place holders that will be replaced at a later time with more complete masts.
 This overhead view shows the decks more clearly. The clear piece on the right is a piece of plastic taken from a CD case. It is being shaped to fit the stern. Once the builder is happy with the shape and fit of the piece he will use it as a template to build the stern piece out of wood.
 At the February meeting a new member brought out his work in progress of his model of HMS Bounty. The model is completely scratch built.
 This shows detail on the deck. There is a small scribed hole where the mast will go.
 The model builder is thinking of putting stub masts on the model. This is a fairly common practice, especially when display height is at a premium.
 Hopefully there will be more to show of this model as the builder progresses with it.
 This Bluenose II Ship model was made from the Artesania-Latina kit. This one was completed within four months. The model builder says that he did his best to make it look good. It was placed under Plexiglas cover to protect it from dust.
 This is a very small and inexpensive adjustable square. It's small size means that it can be carried easily in a pocket. This tool has proved to be extremely useful.
 This is a small saw made by Veritas. It comes with a magnetic guide that includes a clamp, which can open to an inch. The clamp holds a length of wood. The saw blade held by the magnet insures a square cut every time. Veritas is Lee Valley Tools', in house brand name.
 These are a set of punches, a nail set and a chisel. There is a strong spring in the centre. The way the tool is used is to place it where it is to do the work, pull the spring and release it. Doing that propels the business end of the tool as if the end had been hit with a hammer. The difference is that these tools do the job with greater accuracy.
 This is a very small plane. Once the plane and the blade were lapped this tool proved to be very useful for model work as well as larger jobs. It has been used to build model ships and full size boats as well.
 This is a small hack saw with a very thin blade. The tension on the blade can be easily set and the user says it cuts through the hardest woods like butter. The owner of the tool believes he purchased it at Princess Auto.
 These are very small scale chisels. They are easy to sharpen and are very useful for cutting small channels, squaring off drilled holes, etc.
 This is another saw made by Vertas. It has a very flexible blade and the saw teeth are all set on one side only. If you click on the picture to get a larger view you will see it has "this side up" etched on one side near the handle. This tool is ideal for cutting dowels or other protruding items flush with the surface without the need for further sanding or planing. The owner of this tool recommends that when using this saw that a protective glove be worn to prevent the very sharp teeth from cutting fingers.
 This is a small inexpensive metal ruler with a movable square. It can be carried in a breast pocket and has proved to be very useful with a variety of applications.
 This offset screw driver is made by Mastercraft, Canadian Tire's in house brand of tools. The person who gave the presentation said that this is the only offset screw driver he has ever found that is any good and that this one is very good. It comes with an extension and a set of attachments for just about every purpose. In the user's opinion it is very good value for money.

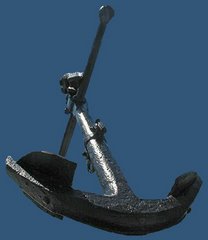
Days after completing this 1:50 scale rotating deck cannon I fell on it when I slipped in water in a parking lot. It took a couple of hours ...


